Fairly straightforward and easy, for the most part. The floating platform sections can be tricky until you get a handle on how they work, then it'll be a fluke to mess basically anything in the stage up. The boss is heavy on the RNG, so some people go for Eagle second in 100% despite doing iceless as well.
any%[]

Basic eagle stage
At the start of the stage, just dash forward and get on the first revolving platform you encounter and ride it up to the second set of revolving platforms.
When you reach the second set of revolving platforms, let the first sky claw survive, it will prevent the third one from spawning. You can kill the second one to get it out of the way. To get to the next ledge, there are a couple options.
The simplest way is to just wait until you can reach the wall with one jump and climb up.
The most common method of climbing is to jump earlier and land on another of the revolving platforms as it comes down and jumping off of that for extra height to reach the wall.

Eagle inflames' first platforms
An alternate way, which can save a small amount of time (5 frames or so), is also fairly risky. It involves a jump underneath one of the platforms as it comes downward, wallkicking off the right side of it and shooting the sky claw, then climbing to the platform the green guy is on, jumping left and wallkicking off another descending platform and climbing up to the right. It has to be done very precisely, cutting jumps as close as possible. If the green guy causes too much lag, even with slightly imprecise movements, it can cost you about half a second. If you miss the first jump underneath the platform, obviously you'll lose a ton of time from having to reclimb everything.
When you get to the turret on the rising platform, if you plan on getting the subtank in this stage, try to land on the platform as early as possible, as the platform is on a timer for when it rises based on when you're standing on it. See the relavent section under 100% for more details on how to get it quickly. Otherwise, continue to the right without going up.
There are two ways to get around the blue guys, either using shotgun ice or taking hits. If you jump at the first blue guy the right way, you can get damaged to the right rather than left, which will save a small amount of time should you go for damage boosts. After the bonk against the second blue guy, you should be able to safely jump to the first and across to the third floating platform without a flamethrower spawning on it. The next section will have a flamethrower on the first platform, you can take a hit on it, wait for the second platform to come down, get to the fourth platform, and dash jump across to the final platform of the section.
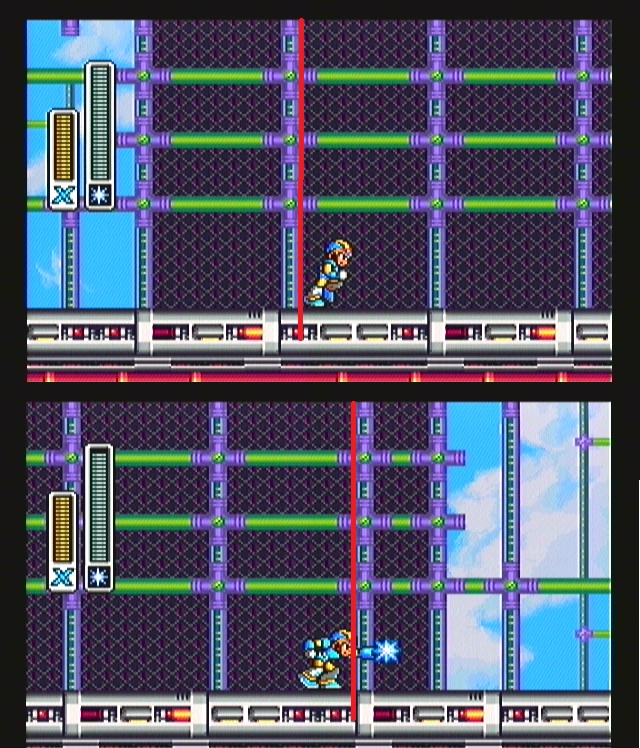
Top: Dash jump when you pass the red line and you'll land at the right position for the shot Bottom: Dash and shoot when you're just left of the red line.
Using ice shots can cause a little lag, but changes up the platform section a little, and allows you to not take a lot of damage. After killing the turret on the rising platform, dash and shoot when you're on the right half of the platform the turret sits on, then jump. The ice shot should hit the blue guy as soon as he spawns on screen, so every ricochet will hit, then you simply fire again as you get close to it and it'll die. There's a visual cue for where to fire to hit the second blue guy as soon as he spawns, then just do the same thing again. Once again, the platforms should be clear of any flamethrowers, so just dash jump onto them asap and cross over. Start holding a charge when you kill the second blue guy, and you can kill the flamethrower on the first platform of the next section. Doing that opens up the opportunity to get quickly to the third platform. Wait for the fourth platform to lower and jump on and continue forward, nothing should be in your way.
Alternatively, you can avoid waiting so long for the fourth platform to drop into position by jumping early, crossing underneath the platform, and wallkicking the right side of it. This can save 20 frames, at the risk of death.

Inflames' eagle thing
The rest of the stage is very simple, a short climb and just running to the right. The two turrets at the end of the stage can be awkward to jump around, but you can kill the first one with either a well-placed c.sting shot to get 2 of the pieces to hit, or using a charged buster shot alongside a couple dash shots. You can simply dash off the platform with the health and ammo pickups to the left and get on the platform that brings you up to eagle, no need to jump.
100%[]

100% is notably different from any% for eagle stage due to all 3 items being out of the way.

To reach the heart quickly, don't kill the sky claws on the second set of revolving platforms. Killing the first will cause a third to spawn higher up, which you don't want. You can use the second for a visual cue for when it's safe to jump to the heart. Any time after the platform passes by the sky claw, you'll be able to make it to reach the ledge (wallkicking fairly low on the wall).
If you already beat Kuwanger, you can save some time grabbing the heart by jumping, firing a boomerang while stopped so it goes far and curves down, and just jumping away. It's difficult to actually despawn the heart this way, so you can get away with jumping away very quickly after firing the boomerang. The heart doesn't actually have to quite be on screen to get grabbed by the boomerang.
There are a few options to get the subtank. The easier way is to dash into the blue guy and just continue dashing through and grab the subtank. The next jump can be a little annoying, since it isn't just a full height jump. It could take a bit of practice to get a feel for how long you need to hold jump to land on one of the next platforms. Without slowing down at all, the second platform section shouldn't have a flamethrower on it, so just continue on to the third platform and wait for the fourth to lower into position and move on.

Crystal's eagle strat comparison
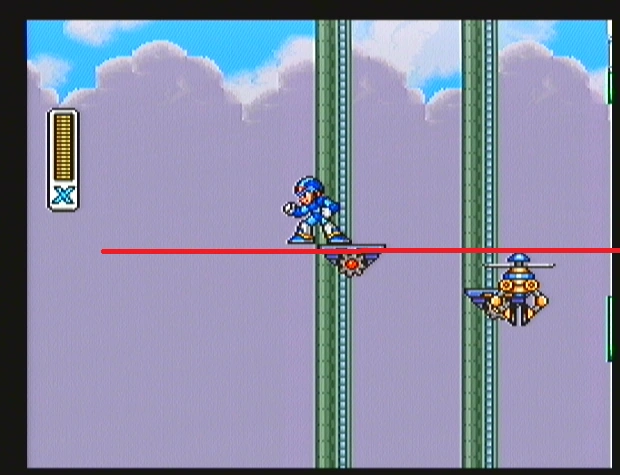
The faster way (by about 2/3 of a second) is to use crystalunclear's strategy. There's a good visual cue for when to fire an ice shot to hit the blue guy with every ricocheted ice shard. Dash, shoot, and jump when X is behind the second pane of glass (between the first two vertical lines in the foreground). Killing the blue guy breaks the glass, which is itself fairly laggy, but getting to the subtank is still 7 frames faster than taking a hit. The real time save comes from the platforms being in different positions because you didn't spend ~30 frames of game time taking a hit after they've already spawned. You can almost get through the whole section without stopping, there's only a brief pause on one of the platforms to avoid having to wallkick off another one near the end.
To get the fast break on the wall leading into the helmet capsule, when you land on the platform in front of the wall, stop touching the dpad. Just dash into the wall, fire an ice shot, and repeat. If you hold right, X will dash into the wall, end his dash, then walk completely into the wall and stop moving. This prevents you from dashing toward the wall any further. If you don't let X walk, though, what happens is his dash sprite is wider than his standing or walking sprites, so when you dash into the wall and the dash ends, your position is actually a bit left of the wall. Since you aren't quite up against the wall, you can still start a dash.

Neymar's ufo
A major time saver in this stage is the platform grab, also known as Neymar's UFO. This trick is quite difficult and should only be attempted if you're approaching a top-level time. It involves grabbing an item with a boomerang (the heart tank) the frame before another grab-able object appears on screen (one of the rising platforms.) You can tell if you have successfully grabbed the platform if you can still see a very small amount of the wall below the main platform as you pick up the heart tank, as shown in the video. Maneuvering the platform can be easily done using a series of visual cues. After successfully grabbing the platform, hold right until the tip of the heart platform goes off-screen, then fall straight down. Kill the sky claw before hitting the ground. Landing back on the platform is hard to explain and just requires practice. On the way back up, wait until X shifts to the right on the platform, then jump off and do 14 quick wall kicks to land in the correct spot to grab the sub-tank without despawning it. At this point, it's important to avoid activating the background's movement which causes a large amount of lag. You can do this either by mashing at a precise rhythm to keep the platform low enough (difficult but faster) or by landing on a lower platform and rising back up (easier but slower.)
Eagle fight[]
The eagle fight in any% isn't terrible, eagle can waste a bit of time, but nothing disasterous (+/- 5 or 6 seconds for good or bad fights). Start the fight with an uncharged buster shot and switch to c.sting for the rest of the fight. If he's diving, when he's at 3 health remaining, you can try to guess which direction he'll dive from and fire early to get an early offscreen kill.
In 100% this fight is a nightmare of luck. Nothing does 3 damage to eagle, so as long as he stays on the ground, just fire dash shots at him. Charge buster shots when he starts to move upward. If he holds position midway up the screen you can still hit him with charged shots. If he starts diving, keep charging up buster shots just in case he comes down midway and goes back up again. Avoid hitting him with mid-charge shots, as those will only deal 1 damage.